Still using those dinosaur old stock fonts that came with your computer? Have you ever downloaded a font? If you answered no: then we need to talk! For those of you who have ever created something that went out into the world using either the ebola equivalent comic sans or bleeding cowboys (font) send me your address, I'm coming to smack you. Computer fonts are like the free wax crayons you are given at a restaurant to entertain yourself with. No one really wants to color with them....they make you look infantil by leaving glob's of wax all over your picture but it's all you were given, so you make do, I get it. But there's more to life people! Don't accept those poopy crayons any longer & don't use the horrible fonts found in the depths of your word program, ask for more out of life!
Font hunting seems like a simple task, one that I now know well. But I do remember a time of confusion & error. So if figuring out how to do it all is what's holding you back, fear no more, I'll post some links below on how to install them. But we will think about that later, let's get to the fun stuff for now. Which is to ask, do you need a font for something specific or are you wanting to have some for fun? For specific projects I recommend going to a site that let's you preview the font with your text. This is helpful because sometimes at first glance a font looks awesome but then like a first date that went well so you commit to more but a few dates later you realize they have this really weird character flaw like moaning everytime they takes a bite of something tasty it has a weird swirl on some of the letter's or it might not include a symbol you need...all this to say....do your homework before you download a ton of fonts you never use. I've listed the top free font sites below & put an asterisk by the ones that let you preview the font with your own text.
Here are some trendy fonts that I love, that are free for personal use to get you started. You can click the fonts below to go to the site:
But maybe you saw a font somewhere you loved & you can't live without it? Fear not. You have two options, probably more, but I only know two so don't be so greedy. First option: use an internet plugin for finding fonts although I have found this to be not so useful as a lot of times it can't identify the web fonts but it does sometimes work so it won't hurt to give it a try. I use Chrome & the plugin for Chrome is called What font?. You can also use this online tool called the Matcherator, that asks you to upload an image of the font & it's suppose to detect it.
Here are the rest of the sites where you can find fonts for free. Some of these sites also have fonts available for sale. Note that if you are designing things for sale you cannot include the font with the product even if it was free, so you'll want to give them the links to where you found these fonts online so they can download them.
Now if you're like me & you get/got too carried away downloading fonts or you foresee this happening I highly recommend organizing your fonts. It's not fun scrolling through every font to see which you want when you have thousands of fonts, especially in cases where you just want to see all of one style like "Handwritten" or "Sans Serif". Font Explorer is just one program you can use to organize but feel free to check out others (or if you have one you use & love share it in comments, we'd love to know why you love it).
So now you have tons of fonts or maybe you're a connoisseur of sorts & not just any old font will do anymore. You want to make a mark. You need to make your own font, to leave a legacy. Well you can. There's lots of places includinng My Script Font or Fonts Ark. I'll admit I haven't made one yet but I'm going to. My scribbly, barely-legible font deserves to be seen & it will make a great font for those wishing to say something cryptic or rude where you can type it but there's a 50% chance they won't even be able to read it.
So once you have some fonts downloaded you'll need to understand pairing them up. Finding a mate you might say. Here's a nice little picture below of a few complementing fonts put together by andreathedesigner. And you'll notice, as with most design, that opposites attract. Isn't that who you ended up marrying? Your complete opposite? And then when you get dressed to go on a date with said husband we all know that (faux)leather & lace outfit combos are as sultry as it gets...& see that there? Leather=tough/boyish mixed with the opposite Lace= soft/feminine & you have a winner. Have fun with that whole mentality as you choose colors for your fonts too. Try grey (colorless) with something bright & bold (opposite of grey!):
Now, I promised to link to some font installing tutorials. I gotta get back to work to make some money so I'm not going to take the time to make ones myself but here's some other people made that get the job done & since these people did take the time to make them show them some love with a like click on the video if it helped you because that helps them. And (starts shameless promotion) if you found my stuff helpful too don't be shisty, share it & comment so I know I'm not writing this stuff to myself!
THE TECHNICAL STUFF ABOUT DONWLOADING:
You will need something to unzip most of the files. Winrar, Winzip, B1 Archiver. Google it, find it, download it. Don't get a virus, pay attention when you're clicking things. Secondly, I recommend backing up your fonts by taking the font file after its installed & moving it a folder thats for all your downloaded fonts. I have mine in my dropbox.
FOR MACS:
This video gets detailed but I have Mountain Lion & I literally just double click the font file & then click install on the popup.
WINDOWS 7:
I chose this tutorial because I was drawn to the bokeh & pretty colors. It also explains stuff pretty well so there's that.
WINDOWS 8:
Nevermind the guy who made this sounds like the Terminator, it was the most thorough video I found.
In celebration of nothing but today I decided to make this action available for free. I have downloaded so many free resources from other blogs & sites & its time to give back. I really don't use Photoshop as often as I used to but the thing I do love about it is it's so great for getting really detailed edits. These days most of my stuff is bulk editing so Im in Lightroom but for Fashion edits or pictures that you want to give that extra something you can't beat Photoshop. This action is really easy to use & looks good on almost any picture have fun playing with it. I know I always forget but if you remember to, post a link in the comments to your edit with the action....its always fun to see how people use different tools. Click the button below to tweet or share to facebook & download
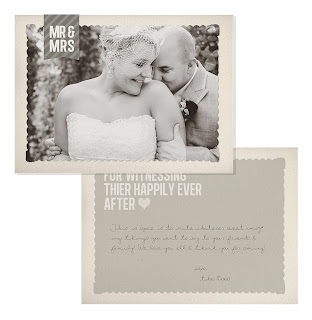
I buy a lot of card templates when Im in a hurry & I need ones for HS Senior grad announcements or Thank You cards but when I have time I love to make them from scratch. The one pictures to the left is one I made that's for sell on Etsy if you want to check out my Etsy store click the image orhere. A lot of times I start off not really sure what direction I want to go with the design. You can easily find inspiration just by looking at elements like certain fonts will make me want to design something a certain way or Ill see a lace or watercolor brush that will inspire me. When I first started designing cards I knew how to use Photoshop but I didn't know how to add the bleed guidelines or use clipping masks. In trying to find a good tutorial I came across one from Finally Friday but you can google how to use clipping masks & find lots of good ones or I posted mine below which covers all aspects of making a card from scratch. The hardest part (&its not so hard actually) is learning how to use clipping masks & understanding where to add your image in the layers panel. The tutorial is great at explaining it as simply as possible & helps you master these tools. The card above is a 5x7 flat card that I made for Thank You cards for a bride & groom. This templates available for sale on my Etsy store, click the image to visit. Ill also be posting free templates as I make new designs, so make sure to subscribe to this blog to get them as they come out.
Making a Card:
1. First & foremost you need to have basic user knowledge of Photoshop or this can all be very confusing. things you;ll want to know already include where the tools & layers panels are, how layers work in general, how to use the text & free transform tools & most importantly how to use Clipping Masks. Oh, & you'll want to actually have Photoshop or another Adobe program for graphic design such as InDesign.
2. The second thing is you'll need to start a small collections of Digital Papers if you don't already have some. I've included some below but you can google digital papers & find a bunch more easily. I recommend making a folder called design tools & sub folders labeled: Papers, textures, shapes, brushes etc. As your collections grows you;ll want to have it organized so you can find things easier.
3. Next you'll need Photoshop brushes & shapes. Brushes & shapes in Photoshop can be all kinds of awesome designs from flowers to arrows to vintage scroll banners. Make sure your getting high res files or else they will look blurry when you use them & also some brushes can only be used at very small sizes so try to check that when your downloading them. A brush is trickier to use then shapes are but there's a lot more options for brushes. They you especially want to get the high-res ones & not bother downloading any that aren't because they can often only be really small...too small usually...to use them for what you want them for or so has been my luck.
4. The last creative element you'll need is lots fonts. The basic ones that come on your computer are boring & overused. My only warning is seriously give yourself a time limit to look through fonts, don't spend a day downloading fonts, there's so many & its easy to get lost in them, I'm guilty! Here's some that I really like below. You'll also want to learn how to use font spacing & kerning in Photoshop to make more interesting designs. Pintrest has tons of great examples of this & you can google Typography for lots more examples & inspiration. Some sites for free fonts include Google Fonts & font garden. Here's some cool ones to get you started just click the picture to go to 'A Subtle Revelry's' Blog & download:
5. Also its important to note that you will probably be completely lost with what to do after you click the 'Download' button for these different creative elements if you do not have something that will unzip the files after its downloaded. You'll need Winrar or any other unzipping program, here's a link for a free trial to Winrar: Download Winrar
6. After the file downloads to your computer it should automatically open in Winrar, if not go to your computer, downloads & open it manually by selecting Winrar as the program to use when you right click the file. Once the file unzips you'll double click the main file (a lot of them come with usage terms & website links so look for the actual file). When you double click the Blue & White icon for the Brushes & Shapes it will automatically open in Photoshop. If it doesn't close Photoshop, open it again & re-check (or if you are Photoshop savvy find the little cog wheel icon in the Brushes, Shapes or Actions areas (they all have one). This is the settings, click it & select load Brushes/Shapes etc).
Here's a few links below to brushes & papers I like, just click the picture to go the site. Also check out Deviant Art& Brusheezy for lots of free everything (paper's brushes, shapes). Just type Photoshop Shapes or Photoshop Brushes, Textures etc. Free digital papers are easiest to find on Pinterestby searching "Free Digital Paper Packs", if you google this term it still pops up a lot of ones you have to buy which is fine but not free. Etsy has tons of beautiful paper packs from designers. Lastly check out Creative Market for modern & beautiful graphic design elements. Just want to mention again, make sure when you are looking & downloading papers & brushes that you download high-res stuff so it doesn't look blurry when you use it.
7. Ok, so now you have some Papers & Brushes & can get started making your own cards. The first step in Photoshop is to set your parameters. When you open Photoshop you'll want to select New instead of open. For whatever size card you are making you will always need to add you bleed area. Your bleed area ensures that as your cards or design is printed there wont be any white edges. It allows for printer error because your design won't stay right in the center of the printer & if it veers off course there need to be a little extra of the design to cover that space. So for a 5x7 card you would actually make the size 5.25" x 7.25" instead of 5" x 7" so you have the needed 1/4" bleed area around the edges for printing. Next you will need to add the ruler guidelines in Photoshop so you know where the end of your design is & where the bleed actually begins. You will want to extend the background into the bleed but keep any text or important parts of any images inside the bleed so they don't get cutoff.
Here's a video showing how how to make a card from start to finish: